Tutorials
Supported Platforms
Egeria currently supports building on *nix, Linux and Linux-like operating systems such as MacOS.
Our official build pipelines are based on x86_64 architecture, but it is expected the build will run on other architectures, subject to the availability of the required tools and interpreters/jvms/runtimes on that platform (for example Java, Python, Docker/containerd/k8s etc).
Currently, the Egeria team does not regularly test or use Windows, so there may be areas that are not documented as well, or not work. We would welcome any interested developers who use Windows on a daily basis to join us and help improve this area!
On Windows, you should use Windows Subsystem for Linux Version 2 or above, and install a Linux distribution such as Ubuntu. This avoids issues we have seen with path separators, symbolic links, slow I/O performance, long path names. WSL version 2 should be used, not version 1, due to differences in file I/O (emulation). The docs above explain how to switch from v1 to v2.
From the command line everything should work just as for macOS & linux, including building and running Egeria since a full linux distribution is being used, with a linux kernel.
However, IDE use may be a little different. Some IDEs can run the GUI in Windows natively, and then use the WSL environment to perform build and execution.
With IntelliJ the following process is most likely to work:
- Ensure an Ubuntu environment is setup using WSL2
- Install a java sdk, and maven as for mac/linux
- ensure a build at the command line works ok
- Install IntelliJ community edition on Windows. Using the latest version (2022.1 at time of writing) is recommended as WSL support is a new area
- Create a new project 'from existing sources' and ensure you point to //wsl$/..... (path in linux environment)
- After a few warnings as IntelliJ detects the code, your SDK should be set automatically to the linux java version
Jetbrains have a WSL2 support article which elaborates these instructions in more detail
Another option would be to run the IDE itself directly within the linux environment, and share the display via X11, VNC, or another form of remote desktop. This is likely to work, but could perform sluggishly. Microsoft are improving this area with WSLg , but this requires very new software, and dedicated graphics to work well. It's also outside the scope of this summary.
Egeria provides both maven and gradle build scripts. On Windows we've seen issues with maven which can cause IntelliJ to be busy or unresponsive for hours. If this happens you could try to use the gradle build instead. To do this in IntelliJ:
- Navigate to your maven tool window,click the top level maven project 'Egeria' & 'Unlink Maven Projects' - and confirm.
- In the left project tree right-click on the top level build.gradle and 'Link gradle project'
Yet another option to use IntelliJ is to make use of Remote Development. With this configuration you would use a seperate linux system, and connect remotely. This is beyond the scope of these docs.
Feedback on Windows, offers to help, clarification on the steps can be directed to odpi/egeria-docs#335
The tutorials provide step-by-step guides to help you work with Egeria and its associated technology. They provide help to:
- Those that just want to run and use Egeria. This includes how to download and build Egeria, install it in a convenient directory, customise it and use containers for cloud deployment.
- Those that want to develop code with Egeria (such as building new connectors or calling Egeria's APIs). This includes setting Egeria up in IntelliJ ready for your development work.
- Those that wish to contribute to Egeria's code base. This includes fixing bugs and adding new features to Egeria.
Tutorials for running Egeria
Egeria can be set up and run using the following methods:
-
Set-up to support the open metadata labs. These labs show Egeria in an operational mode serving different users in the Coco Pharmaceuticals business. Egeria is integrated with a variety of technologies in this environment, and it is set up to specifically support the scenarios within the labs. Follow this link if you want to run the labs.
-
Used directly from a prebuilt docker image from either DockerHub or Quay.io. This docker image includes all the Egeria runtimes and can be used to experiment with different features of Egeria. If this option is for you, go to the docker tutorial.
-
Customized to support the specific needs of your organization.
Customizing Egeria typically begins with downloading and building Egeria's source code. This requires Java.
Installing Java
Installing Java
Java is a relatively mature object-oriented programming language that was originally designed to be able to easily run programs across a number of different computer systems.
The Egeria project itself is primarily written in Java, and therefore a Java Runtime Environment (JRE) is the most basic component needed in order to run Egeria.
You will need a Java Development Kit (JDK) installed on your machine in order to build Egeria. (A JDK will include a JRE.)
There are various JREs/JDKs available, and you may even have one pre-installed on your system. You can check
if java is already installed by running the command java -version from the command-line.
Java can be installed by:
- Downloading the OpenJDK 17 (LTS) HotSpot JVM from Adoptium.
- Running the installer that is downloaded.
Alternatively you may wish to install from your package manager such as homebrew on macOS.
Once you have Java installed, you are ready to begin:
Downloading Egeria's source code
Downloading Egeria from GitHub website
Open Egeria's git repository on GitHub by clicking on this link: https://github.com/odpi/egeria. The code that is displayed is the latest version of the Egeria code and it is in a branch called main. This is the default code that will be downloaded. If you want a specific release, click on the main button to reveal a scrollable menu. Scroll down to the branches named egeria-release-{version-number} and select the release you desire.
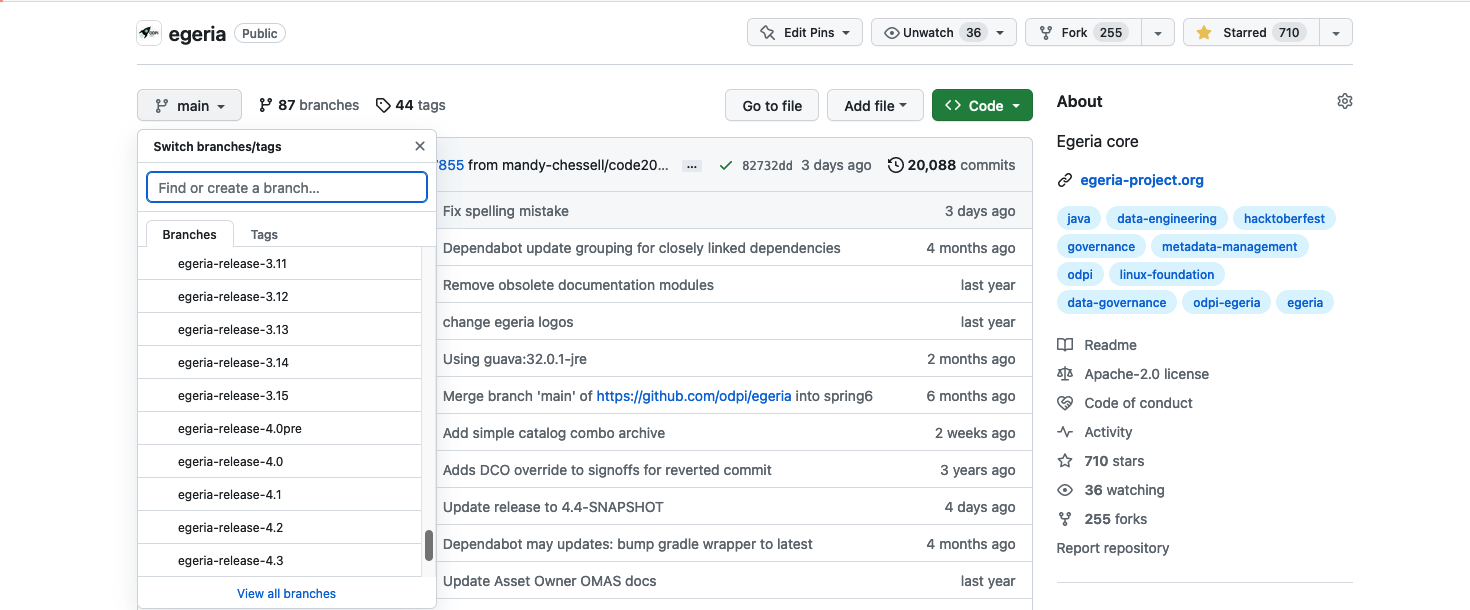
Click on the green <> Code button to reveal a menu and select Download ZIP

The egeria source is quite big do it may take a few minutes to download. Once it is downloaded, you can unpack the zip file into a suitable directory (folder) on your machine. The file structure will be the same as the structure shown on GitHub.
Building Egeria
Building the Egeria Source
When you download (clone) the contents of the egeria.git repository from GitHub, a new directory is created that is named after the repository that you cloned. So the directory created when the main egeria.git repository is cloned is called egeria. This directory contains all the source and the build scripts.
Change to the egeria directory:
cd egeria
Building with Gradle (V4.0 and beyond)
The Gradle processing works through the project modules. Each module has a build.gradle file that defines the artifact, its dependencies and any special processing that the module builds. The top-level build.gradle file at the root of the repository's source code directory structure controls the overall process. It runs the build in parallel threads to speed up the process of the build, but may take many cycles of your machine's capacity. When it is running, it may be a good time for a break!
Maven repositories
This processing includes locating and downloading external libraries and dependencies, typically from an online open source repository called Maven Central and our snapshot repository on https://oss.sonatype.org, so make sure you are online when you run the build.
No gradle installation is required, as we use the 'gradle wrapper' which will automatically install gradle if needed. This reduces the setup steps, and ensure everyone runs the same version of gradle.
This is a regular incremental build, but will also run all tests and generate javadoc.
./gradlew build
The quick build skips generation of javadoc, and tests
./gradlew build -x test -x javadoc
We avoid any use of cache, and ensure a full clean build. This may be needed when you want to recheck something that has no changed sources, but needs a rebuild -- for example to review compiler warning messages (not errors)
./gradlew clean build --no-build-cache
This build option creates an OMAG Server Platform where the registered services are optional. The OMAG Server Platform loads the registered services it finds on the loader path specified with the -Dloader.path={directoryName} option of its startup command. Use this option if you want to remove the registered services that you are not using, or you would like introduce your own registered services.
./gradlew -PadminChassisOnly build
The build will typically take from seconds to 10 minutes depending on the speed of your machine and the number of projects that need to be built.
BUILD SUCCESSFUL in 4m 51s
3290 actionable tasks: 3172 executed, 118 up-to-date
Building with Maven (Before V4.0)
If building a version of Egeria prior to version 4, the maven instructions can be found below:
Prior to V4.0 Maven is used to build the following repositories:
- egeria.git - main Egeria libraries.
- egeria-samples.git - coded samples of using Egeria.
- egeria-dev-projects.git - utilities and connectors for developers to use and develop further.
The Maven processing organizes the modules into a hierarchy. Each module has a pom.xml file (called the pom file) that defines the artifact, its parent / children, dependencies and any special processing that the module builds. The top-level pom file is the pom.xml file at the root of the repository's source code directory structure.
When the Maven command is run, it passes through the hierarchy of modules multiple times. Each pass processes a particular lifecycle phase of the build (to ensure, for example, Java source files are compiled before the resulting object files are packaged into a jar file).
Maven repositories
This processing includes locating and downloading external libraries and dependencies, typically from an online open source repository called Maven Central. The directory where these external dependencies is stored locally is called .m2.
Installing Maven
Installing Maven
Apache Maven is a build tool at is being phased out in the Egeria project, but is still required by some repositories and the Egeria developer dojo. It is capable of code compilation, running unit tests, validating dependencies and Javadoc as well as build our distribution archive.
Where it is used, Egeria requires Maven 3.5 or higher. 3.6.x or above is recommended.
Check if Maven is installed
mvn --version
Maven can be installed by downloading the software from the Apache maven website and unpacking it into a directory that is included in your PATH. Alternatively these methods are available:
Install Maven through HomeBrew
brew install maven
Install through yum
yum install maven
Install through apt-get
apt-get install maven
On Windows, you should use Windows Subsystem for Linux Version 2 or above, install an appropriate Linux distribution, and follow the instructions for that Linux distribution.
!! cli "Rebuild a module with Maven" From the module's directory issue command:
mvn clean install
The egeria.git repository has a top-level pom file so all of the modules can be built using one mvn clean install command from the top-level egeria directory. There is also a quick build option for people just wishing to use Egeria rather than make changes - enter mvn clean install -P quick -D skipFVT
The egeria-samples.git repository does not have a top-level pom file. Each sample is built separately. When you want to build a sample, change to the sample's directory where the pom.xml file is located and issue mvn clean install.
The egeria-dev-projects.git repository has a top-level pom fileo all of the modules can be built using one mvn clean install command from the top-level egeria-dev-projects directory.
The build can take 15 minutes to over an hour depending on the repository and on the speed/load on your machine. However eventually you will see the message:
[INFO] ------------------------------------------------------------------------
[INFO] BUILD SUCCESS
[INFO] ------------------------------------------------------------------------
[INFO] Total time: 54:54 min
[INFO] Finished at: 2020-01-29T09:33:17Z
[INFO] Final Memory: 171M/3510M
[INFO] ------------------------------------------------------------------------

Process finished with exit code 0
Once the build is complete, the executable files you need can be found under open-metadata-distribution. Change to this directory and list the files.
cd open-metadata-distribution
ls
The directories that you see will depend on the release of Egeria. Look in the README.md for a description of the different distributions that have been built.
more README.md
Installing Egeria
Installing Egeria
The egeria build process creates the distribution files for Egeria in the open-metadata-distribution/omag-server-platform module. To see its contents, after a full gradle build completes, use the following cd command to change to its build/distributions directory:
cd open-metadata-distribution/omag-server-platform/build/distributions
ls
egeria-platform-{release}-distribution.tar.gz or egeria-platform-4.3-distribution.tar.gz in this example.
egeria-platform-4.3-distribution.tar.gz
Create a directory for Egeria and copy the tar file into it. The two commands shown below creates a directory in your home directory and then copies the egeria distribution file into it.
mkdir ~/egeria-install
cp egeria*-distribution.tar.gz ~/egeria-install
This next command changes to the new directory.
cd ~/egeria-install
It is now possible to unpack the tar file with the following steps.
gunzip egeria*-distribution.tar.gz
tar -xf egeria*-distribution.tar
egeria-platform-{release}-distribution.tar.gz or egeria-platform-4.3-distribution.tar.gz in this example. Change to this new directory and list its contents as shown below.
cd egeria*gz
ls
Dockerfile      LICENSE         NOTICE
README.md       assembly        dist
The Dockerfile contains the directives to build a docker image. Instructions for doing this are in the README.md file. Change to the assembly directory.
cd assembly
ls
README.md etc opt platform
platform is a directory for the OMAG Server Platform that is used to run open metadata and governance services. This is the omag-server-platform-{{release}}.jar.
ls platform
README.md                  data       keystore.p12     logs                            truststore.p12
application.properties     extra      lib              omag-server-platform-4.3.jar
platform/lib directory is where the jar files for connectors, samples and new registered services are installed. It includes the connectors that are located in the egeria.git repository.
ls platform/lib
README.md                                                       csv-file-connector-4.3.jar                                      jdbc-integration-connector-4.3.jar
apache-atlas-rest-connector-4.3.jar                             data-folder-connector-4.3.jar                                   jdbc-resource-connector-4.3.jar
atlas-integration-connector-4.3.jar                             discovery-service-connectors-4.3.jar                            kafka-integration-connector-4.3.jar
audit-log-console-connector-4.3.jar                             dynamic-archiver-connectors-4.3.jar                             kafka-open-metadata-topic-connector-4.3.jar
audit-log-event-topic-connector-4.3.jar                         elasticsearch-integration-connector-4.3.jar                     omrs-rest-repository-connector-4.3.jar
audit-log-file-connector-4.3.jar                                env-variable-secrets-store-connector-4.3.jar                    open-lineage-janus-connector-4.3.jar
audit-log-slf4j-connector-4.3.jar                               files-integration-connectors-4.3.jar                            open-metadata-archive-directory-connector-4.3.jar
avro-file-connector-4.3.jar                                     governance-action-connectors-4.3.jar                            open-metadata-archive-file-connector-4.3.jar
basic-file-connector-4.3.jar                                    governance-services-sample-4.3.jar                              open-metadata-security-samples-4.3.jar
cohort-registry-file-store-connector-4.3.jar                    graph-repository-connector-jar-with-dependencies-4.3.jar        openapi-integration-connector-4.3.jar
configuration-encrypted-file-store-connector-4.3.jar            inmemory-open-metadata-topic-connector-4.3.jar                  openlineage-integration-connectors-4.3.jar
configuration-file-store-connector-4.3.jar                      inmemory-repository-connector-4.3.jar                           spring-rest-client-connector-4.3.jar
platform/extra directory is where connectors from other repositories are added (including those that you write yourself). Copy the jar files for any additional connectors you want to use into the extra directory. The connectors available for Egeria are listed in the Connector Catalog.
The opt and etc directories contain additional content that can used with the platform. For example, the etc/reports directory contains java programs that describe different aspects of the platform.
ls etc/reports
README.md component-id-report.jar database-report.jar egeria-platform-report.jar
opt/content-packs directory contains Open Metadata Archives that provide sample open metadata content. The README.md describes their content.
ls content-packs
CloudInformationModel.json                      CocoGovernanceProgramArchive.json               OpenConnectorsArchive.json                      SimpleDataCatalog.json
CocoBusinessSystemsArchive.json                 CocoOrganizationArchive.json                    OpenMetadataTypes.json                          SimpleEventCatalog.json
CocoClinicalTrialsTemplatesArchive.json         CocoSustainabilityArchive.json                  README.md                                       SimpleGovernanceCatalog.json
CocoComboArchive.json                           CocoTypesArchive.json                           SimpleAPICatalog.json
CocoGovernanceEngineDefinitionsArchive.json     DataStoreConnectorTypes.json                    SimpleCatalog.json
/opt/sample-data directory contains sample data that is used in various labs and samples.
ls /opt/sample-data/*
opt/sample-data/README.md

opt/sample-data/data-files:
CompDir-ContactEmail.csv        CompDir-ContactPhone.csv        Employee-Dept.csv               Location-WorkLocation.csv
CompDir-ContactList.csv         EmplSAnl-EmpSalaryAnalysis.csv  Employee-Employee.csv           Patient-Patient.csv

opt/sample-data/database:
ibm-db2         mariadb         postgresql

opt/sample-data/oak-dene-drop-foot-weekly-measurements:
week1.csv       week2.csv       week3.csv       week4.csv       week5.csv       week6.csv       week7.csv       week8.csv       week9.csv
Notice that each directory contains a README.md file that explains the content of the directory.
Once Egeria is installed, it is ready to be used, or you can use it to set up IntelliJ.
Tutorials for using Egeria
The installed assembly gives you the option to run the platform directly from this assembly and/or customize the assembly and build it into a Docker image that can be used as part of a cloud-deployment.
Working with the OMAG Server Platform
OMAG Server Platform tutorial
The OMAG Server Platform tutorial takes you through the process of starting and stopping the platform; configuring, starting and stopping servers and querying the status of the platform and its servers.
Building a customized docker image
Building a customized docker image
The top-level directory of the Egeria omag-server-platform assembly contains the following files:
$ ls
Dockerfile      LICENSE         NOTICE          README.md       assembly      dist
The Dockerfile contains the properties for building a docker image of all the files under assembly/platform.
Once you have the contents of assembly/platform as you want them, run the docker command:
docker build -t egeria-platform:{myversion} -f Dockerfile .
{myversion} with a tag name for this docker image. The example below used latest as the tag name.
? docker build -t egeria-platform:latest -f Dockerfile .
[+] Building 44.9s (5/5) FINISHED                                                                                                    docker:desktop-linux
 => [internal] load build definition from Dockerfile                                                                                                 0.0s
 => => transferring dockerfile: 3.28kB                                                                                                               0.0s
 => [internal] load .dockerignore                                                                                                                    0.0s
 => => transferring context: 2B                                                                                                                      0.0s
 => [internal] load metadata for registry.access.redhat.com/ubi9/openjdk-17:latest                                                                   1.5s
 => [1/1] FROM registry.access.redhat.com/ubi9/openjdk-17@sha256:3eded7b50a5ff8a55895c7b70c9dfc6e320363e5812a68747f281f8f4bb323ac                   43.3s
 => => resolve registry.access.redhat.com/ubi9/openjdk-17@sha256:3eded7b50a5ff8a55895c7b70c9dfc6e320363e5812a68747f281f8f4bb323ac                    0.0s
 => => sha256:5cbda490fcb7ab72e85cfba7098858cd3ed6bb15f95687e86979f6d4ac7b2f15 596B / 596B                                                           0.0s
 => => sha256:5b5deb1288720666a590472d9a506500df9ebe3c817e9710327162ccd24c4e22 24.19kB / 24.19kB                                                     0.0s
 => => sha256:62742f27dce5ebff467a57ad6bfa680820f3bc534cc313627f8113246276bf0f 37.83MB / 37.83MB                                                    17.9s
 => => sha256:f008a4f4b21c818e8bbd4e2521eb30ab0f8a43dc259e9e51c0d134641e343acd 110.80MB / 110.80MB                                                  37.5s
 => => sha256:3eded7b50a5ff8a55895c7b70c9dfc6e320363e5812a68747f281f8f4bb323ac 1.47kB / 1.47kB                                                       0.0s
 => => extracting sha256:62742f27dce5ebff467a57ad6bfa680820f3bc534cc313627f8113246276bf0f                                                            2.0s
 => => extracting sha256:f008a4f4b21c818e8bbd4e2521eb30ab0f8a43dc259e9e51c0d134641e343acd                                                            5.5s
 => exporting to image                                                                                                                               0.0s
 => => exporting layers                                                                                                                              0.0s
 => => writing image sha256:5a2c784ed7558dc625d109c04c8b5e78534b270a29d3011eb771fd01724c097f                                                         0.0s
 => => naming to docker.io/library/egeria-platform:latest                                                                                            0.0s

What's Next?
  View summary of image vulnerabilities and recommendations → docker scout quickview
The resulting docker image is published to the docker service configured on your local machine.
Tutorials for developing with Egeria
The Egeria community typically uses IntelliJ for its development.
Customizing Egeria typically begins with downloading and building Egeria's source code. This requires Java.
Installing Java
Installing Java
Java is a relatively mature object-oriented programming language that was originally designed to be able to easily run programs across a number of different computer systems.
The Egeria project itself is primarily written in Java, and therefore a Java Runtime Environment (JRE) is the most basic component needed in order to run Egeria.
You will need a Java Development Kit (JDK) installed on your machine in order to build Egeria. (A JDK will include a JRE.)
There are various JREs/JDKs available, and you may even have one pre-installed on your system. You can check
if java is already installed by running the command java -version from the command-line.
Java can be installed by:
- Downloading the OpenJDK 17 (LTS) HotSpot JVM from Adoptium.
- Running the installer that is downloaded.
Alternatively you may wish to install from your package manager such as homebrew on macOS.
Once you have Java installed, you are ready to begin:
Downloading Egeria's source code
Downloading Egeria from GitHub website
Open Egeria's git repository on GitHub by clicking on this link: https://github.com/odpi/egeria. The code that is displayed is the latest version of the Egeria code and it is in a branch called main. This is the default code that will be downloaded. If you want a specific release, click on the main button to reveal a scrollable menu. Scroll down to the branches named egeria-release-{version-number} and select the release you desire.
Click on the green <> Code button to reveal a menu and select Download ZIP
The egeria source is quite big do it may take a few minutes to download. Once it is downloaded, you can unpack the zip file into a suitable directory (folder) on your machine. The file structure will be the same as the structure shown on GitHub.
Building Egeria
Building the Egeria Source
When you download (clone) the contents of the egeria.git repository from GitHub, a new directory is created that is named after the repository that you cloned. So the directory created when the main egeria.git repository is cloned is called egeria. This directory contains all the source and the build scripts.
Change to the egeria directory:
cd egeria
Building with Gradle (V4.0 and beyond)
The Gradle processing works through the project modules. Each module has a build.gradle file that defines the artifact, its dependencies and any special processing that the module builds. The top-level build.gradle file at the root of the repository's source code directory structure controls the overall process. It runs the build in parallel threads to speed up the process of the build, but may take many cycles of your machine's capacity. When it is running, it may be a good time for a break!
Maven repositories
This processing includes locating and downloading external libraries and dependencies, typically from an online open source repository called Maven Central and our snapshot repository on https://oss.sonatype.org, so make sure you are online when you run the build.
No gradle installation is required, as we use the 'gradle wrapper' which will automatically install gradle if needed. This reduces the setup steps, and ensure everyone runs the same version of gradle.
This is a regular incremental build, but will also run all tests and generate javadoc.
./gradlew build
The quick build skips generation of javadoc, and tests
./gradlew build -x test -x javadoc
We avoid any use of cache, and ensure a full clean build. This may be needed when you want to recheck something that has no changed sources, but needs a rebuild -- for example to review compiler warning messages (not errors)
./gradlew clean build --no-build-cache
This build option creates an OMAG Server Platform where the registered services are optional. The OMAG Server Platform loads the registered services it finds on the loader path specified with the -Dloader.path={directoryName} option of its startup command. Use this option if you want to remove the registered services that you are not using, or you would like introduce your own registered services.
./gradlew -PadminChassisOnly build
The build will typically take from seconds to 10 minutes depending on the speed of your machine and the number of projects that need to be built.
BUILD SUCCESSFUL in 4m 51s
3290 actionable tasks: 3172 executed, 118 up-to-date
Building with Maven (Before V4.0)
If building a version of Egeria prior to version 4, the maven instructions can be found below:
Prior to V4.0 Maven is used to build the following repositories:
- egeria.git - main Egeria libraries.
- egeria-samples.git - coded samples of using Egeria.
- egeria-dev-projects.git - utilities and connectors for developers to use and develop further.
The Maven processing organizes the modules into a hierarchy. Each module has a pom.xml file (called the pom file) that defines the artifact, its parent / children, dependencies and any special processing that the module builds. The top-level pom file is the pom.xml file at the root of the repository's source code directory structure.
When the Maven command is run, it passes through the hierarchy of modules multiple times. Each pass processes a particular lifecycle phase of the build (to ensure, for example, Java source files are compiled before the resulting object files are packaged into a jar file).
Maven repositories
This processing includes locating and downloading external libraries and dependencies, typically from an online open source repository called Maven Central. The directory where these external dependencies is stored locally is called .m2.
Installing Maven
Installing Maven
Apache Maven is a build tool at is being phased out in the Egeria project, but is still required by some repositories and the Egeria developer dojo. It is capable of code compilation, running unit tests, validating dependencies and Javadoc as well as build our distribution archive.
Where it is used, Egeria requires Maven 3.5 or higher. 3.6.x or above is recommended.
Check if Maven is installed
mvn --version
Maven can be installed by downloading the software from the Apache maven website and unpacking it into a directory that is included in your PATH. Alternatively these methods are available:
Install Maven through HomeBrew
brew install maven
Install through yum
yum install maven
Install through apt-get
apt-get install maven
On Windows, you should use Windows Subsystem for Linux Version 2 or above, install an appropriate Linux distribution, and follow the instructions for that Linux distribution.
!! cli "Rebuild a module with Maven" From the module's directory issue command:
mvn clean install
The egeria.git repository has a top-level pom file so all of the modules can be built using one mvn clean install command from the top-level egeria directory. There is also a quick build option for people just wishing to use Egeria rather than make changes - enter mvn clean install -P quick -D skipFVT
The egeria-samples.git repository does not have a top-level pom file. Each sample is built separately. When you want to build a sample, change to the sample's directory where the pom.xml file is located and issue mvn clean install.
The egeria-dev-projects.git repository has a top-level pom fileo all of the modules can be built using one mvn clean install command from the top-level egeria-dev-projects directory.
The build can take 15 minutes to over an hour depending on the repository and on the speed/load on your machine. However eventually you will see the message:
[INFO] ------------------------------------------------------------------------
[INFO] BUILD SUCCESS
[INFO] ------------------------------------------------------------------------
[INFO] Total time: 54:54 min
[INFO] Finished at: 2020-01-29T09:33:17Z
[INFO] Final Memory: 171M/3510M
[INFO] ------------------------------------------------------------------------

Process finished with exit code 0
Once the build is complete, the executable files you need can be found under open-metadata-distribution. Change to this directory and list the files.
cd open-metadata-distribution
ls
The directories that you see will depend on the release of Egeria. Look in the README.md for a description of the different distributions that have been built.
more README.md
Installing Egeria
Installing Egeria
The egeria build process creates the distribution files for Egeria in the open-metadata-distribution/omag-server-platform module. To see its contents, after a full gradle build completes, use the following cd command to change to its build/distributions directory:
cd open-metadata-distribution/omag-server-platform/build/distributions
ls
egeria-platform-{release}-distribution.tar.gz or egeria-platform-4.3-distribution.tar.gz in this example.
egeria-platform-4.3-distribution.tar.gz
Create a directory for Egeria and copy the tar file into it. The two commands shown below creates a directory in your home directory and then copies the egeria distribution file into it.
mkdir ~/egeria-install
cp egeria*-distribution.tar.gz ~/egeria-install
This next command changes to the new directory.
cd ~/egeria-install
It is now possible to unpack the tar file with the following steps.
gunzip egeria*-distribution.tar.gz
tar -xf egeria*-distribution.tar
egeria-platform-{release}-distribution.tar.gz or egeria-platform-4.3-distribution.tar.gz in this example. Change to this new directory and list its contents as shown below.
cd egeria*gz
ls
Dockerfile      LICENSE         NOTICE
README.md       assembly        dist
The Dockerfile contains the directives to build a docker image. Instructions for doing this are in the README.md file. Change to the assembly directory.
cd assembly
ls
README.md etc opt platform
platform is a directory for the OMAG Server Platform that is used to run open metadata and governance services. This is the omag-server-platform-{{release}}.jar.
ls platform
README.md                  data       keystore.p12     logs                            truststore.p12
application.properties     extra      lib              omag-server-platform-4.3.jar
platform/lib directory is where the jar files for connectors, samples and new registered services are installed. It includes the connectors that are located in the egeria.git repository.
ls platform/lib
README.md                                                       csv-file-connector-4.3.jar                                      jdbc-integration-connector-4.3.jar
apache-atlas-rest-connector-4.3.jar                             data-folder-connector-4.3.jar                                   jdbc-resource-connector-4.3.jar
atlas-integration-connector-4.3.jar                             discovery-service-connectors-4.3.jar                            kafka-integration-connector-4.3.jar
audit-log-console-connector-4.3.jar                             dynamic-archiver-connectors-4.3.jar                             kafka-open-metadata-topic-connector-4.3.jar
audit-log-event-topic-connector-4.3.jar                         elasticsearch-integration-connector-4.3.jar                     omrs-rest-repository-connector-4.3.jar
audit-log-file-connector-4.3.jar                                env-variable-secrets-store-connector-4.3.jar                    open-lineage-janus-connector-4.3.jar
audit-log-slf4j-connector-4.3.jar                               files-integration-connectors-4.3.jar                            open-metadata-archive-directory-connector-4.3.jar
avro-file-connector-4.3.jar                                     governance-action-connectors-4.3.jar                            open-metadata-archive-file-connector-4.3.jar
basic-file-connector-4.3.jar                                    governance-services-sample-4.3.jar                              open-metadata-security-samples-4.3.jar
cohort-registry-file-store-connector-4.3.jar                    graph-repository-connector-jar-with-dependencies-4.3.jar        openapi-integration-connector-4.3.jar
configuration-encrypted-file-store-connector-4.3.jar            inmemory-open-metadata-topic-connector-4.3.jar                  openlineage-integration-connectors-4.3.jar
configuration-file-store-connector-4.3.jar                      inmemory-repository-connector-4.3.jar                           spring-rest-client-connector-4.3.jar
platform/extra directory is where connectors from other repositories are added (including those that you write yourself). Copy the jar files for any additional connectors you want to use into the extra directory. The connectors available for Egeria are listed in the Connector Catalog.
The opt and etc directories contain additional content that can used with the platform. For example, the etc/reports directory contains java programs that describe different aspects of the platform.
ls etc/reports
README.md component-id-report.jar database-report.jar egeria-platform-report.jar
opt/content-packs directory contains Open Metadata Archives that provide sample open metadata content. The README.md describes their content.
ls content-packs
CloudInformationModel.json                      CocoGovernanceProgramArchive.json               OpenConnectorsArchive.json                      SimpleDataCatalog.json
CocoBusinessSystemsArchive.json                 CocoOrganizationArchive.json                    OpenMetadataTypes.json                          SimpleEventCatalog.json
CocoClinicalTrialsTemplatesArchive.json         CocoSustainabilityArchive.json                  README.md                                       SimpleGovernanceCatalog.json
CocoComboArchive.json                           CocoTypesArchive.json                           SimpleAPICatalog.json
CocoGovernanceEngineDefinitionsArchive.json     DataStoreConnectorTypes.json                    SimpleCatalog.json
/opt/sample-data directory contains sample data that is used in various labs and samples.
ls /opt/sample-data/*
opt/sample-data/README.md

opt/sample-data/data-files:
CompDir-ContactEmail.csv        CompDir-ContactPhone.csv        Employee-Dept.csv               Location-WorkLocation.csv
CompDir-ContactList.csv         EmplSAnl-EmpSalaryAnalysis.csv  Employee-Employee.csv           Patient-Patient.csv

opt/sample-data/database:
ibm-db2         mariadb         postgresql

opt/sample-data/oak-dene-drop-foot-weekly-measurements:
week1.csv       week2.csv       week3.csv       week4.csv       week5.csv       week6.csv       week7.csv       week8.csv       week9.csv
Notice that each directory contains a README.md file that explains the content of the directory.
Once Egeria is installed, it is ready to be used.
Information on how to set up your copy of IntelliJ with Egeria and build new components that work with Egeria are found in the Using IntelliJ tutorial.
Tutorials for contributing to Egeria
Egeria uses GitHub's fork and pull model to create a contribution. This process is described in detail in the Git and GitHub tutorial.
Each change should have a GitHub issue explaining why the change is being made. The new or updated content should follow the Egeria developer guidelines.
Every contribution is signed to say that the contributor has the rights to make the contribution and agrees with the Developer Certificate of Origin (DCO)